Storts Market

by Lesley Storts


2 Comments

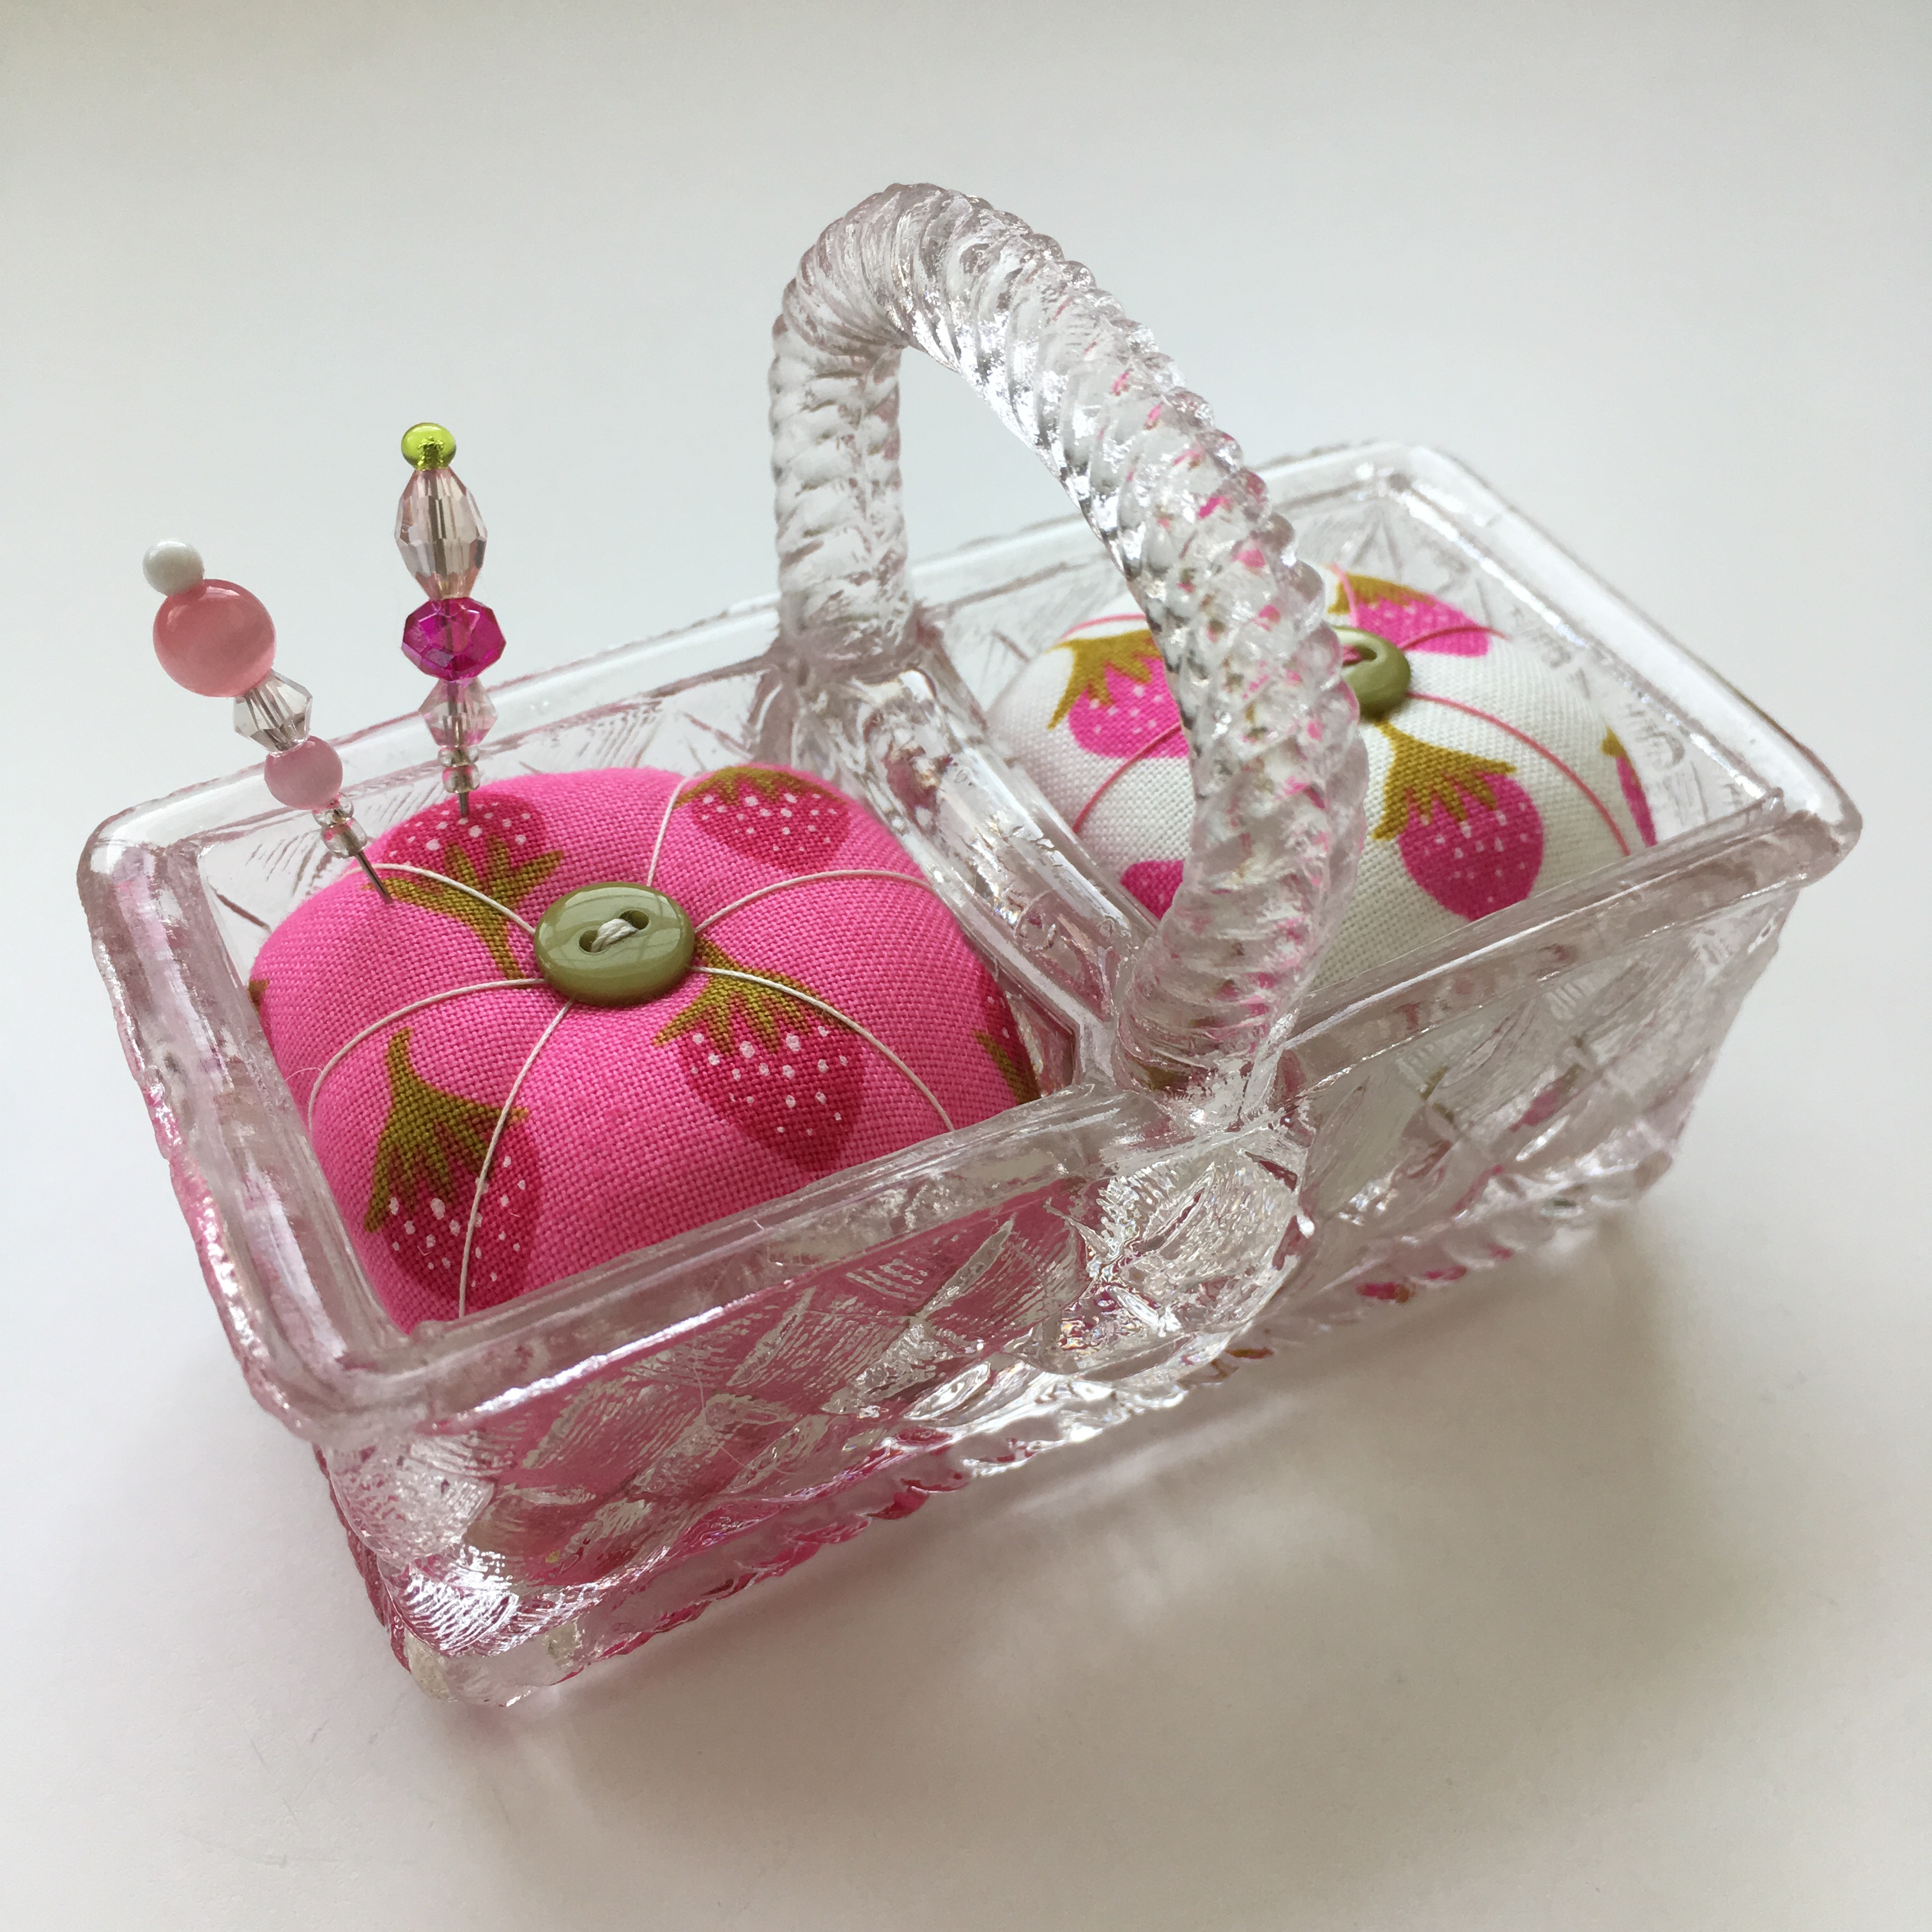
»Pincushions in Salt Cellars«

My adventure into making pincushions was not planned. I entered a quilt in the National Quilting Association’s (NQA) quilt show several years ago. While there, I was browsing through the vendors and came upon salt cellar pincushions. I was smitten. I bought 3, one for me and each of my daughters. The little salt cellar dishes are unique and charming. I wanted to make them and told my daughter, Lucy, that we should try to make them together. We live in the midwest and there is an abundance of antique stores here giving us ample opportunity to look for old glass. The following summer, after collecting some glass salt cellars, Lucy set out to make the pincushions. She had recently had ankle surgery and was non-weight bearing and looking for something to do because she was bored. She did an amazing job troubleshooting the pincushions. I had a basic idea of how to make them, but she perfected it! Several years and a thousand+ pincushions later, we still love making them – it’s so much fun! I’m a quilter, but now I feel like I’m a pincushion artist too. We have expanded the pincushion containers beyond the salt cellars, but salt cellars are how we started and still my favorite base to use in making the pincushions.

The books pictured above, The Open Salt Compendium and 5,000 Open Salts, A Collector’s Guide, catalog a large variety of salts and include the manufacturer and date of production. Another reference is Salty Comments which was written from 1984-2005 by Ed and Kay Berg. Their early newsletters were written on a typewriter and pictures of salt cellars were hand drawn.

Our process of sewing on a button with matching thread and creating a custom crystal and glass beaded pin gives each pincushion their own personality and appeal. My pincushion journey includes hunting for glass and looking for just the right fabric, or cut of fabric, to make the pincushions. I have met a lot of interesting people and learned so much along the way. I am sure I will continue enjoying the whole process.

Happy Crafting and Quilting! ▶︎ ▶︎ ▶︎


Leave a comment

»Suzy Ultman Salt Cellar Pincushions«

The hunt for fabric to make salt cellar pincushions is always fun! When I spotted Suzy’s fabric at my LQS, Sew to Speak, I knew it would probably be a favorite.
IMG_8425
Suzy Ultman’s has such a fun style with her art and creations! The prints from Suzy’s Minis 2 are perfect for salt cellar pincushions because of their petite scale.

Another enjoyable part of the process was picking out accessories including buttons and creating the custom crystal bead pins. These little popsicles needed a very small button! I call it a micro button. I’ve had these in my stash for a long time and never really thought I’d use them.
IMG_9203

OLYMPUS DIGITAL CAMERA

The term “cuteness overload”  is not an exaggeration with these prints!

OLYMPUS DIGITAL CAMERA

If you are interested in a pincushion, visit my Etsy shop! And keep up to date with pincushion progress on my IG @lesleystorts.

Happy Quilting! ▶︎ ▶︎ ▶︎


2 Comments

»A Study In Focus«

IMG_8835Saltcellar Pincushion made with Carolyn Friedlander’s Dentals in Green.

It has been almost a year since I began hunting for saltcellars and making pincushions. Lucy, one of my daughters, has been instrumental in helping perfect this little pieces of art. And as we have learned and grown in making these, an interesting thing has happened- I have come to appreciate fabric and the patterns in a different way. There is a  need to focus on small areas and what they have to offer in a saltcellar. The diameter of most saltcellars we use is about 1 1/4 – 1 1/2 inches. Some of the dishes are a little bigger, but generally they are small. This means that we have to maximize where we cut.

I love the color green and adore this fabric by Anna Maria Horner called Minutes in Glen. I was excited to use it in a pincushion and took special care to cut it so that I was able show an interesting part of the fabric.

Another beautiful and interesting fabric we’ve used is Tula Pink’s Bats in the Belfry in Plum. Depending on what you wanted to highlight with this fabric would depend on where you cut for the pincushion. This fabric offers many choices that would work well. Lucy made this pincushion and wanted to make sure to include blue so that it stood out.

OLYMPUS DIGITAL CAMERA

I love quilt making and will continue making quilts. I do appreciate though, the opportunity to look at fabric in a different way and that has come through making pincushions.

OLYMPUS DIGITAL CAMERA

OLYMPUS DIGITAL CAMERA

Happy Crafting and Quilting! ▶︎ ▶︎ ▶︎

Enjoy posts on IG at my sites @lesleystorts and @stortsmarket


Leave a comment

»Playing with Wool«

Many years ago (so many I can’t really remember when, which brings up unfinished projects, which may be a whole blog in and of itself 😉), I found the pattern Fit to Frame by Lori Smith at one of my local quilt shops. I like handwork because I can take it with me to kid events or other appointments where I find myself sitting and waiting. The blocks did not take me too long to blanket stitch, maybe 4-6 month and only when I was out and about, but quilting it took FOREVER because I could not make up my mind what I wanted to do.

I first thought I wanted to hand quilt it. I even started hand quilting it, but did not like it because the stitches were so light and small and got lost in the background fabric which is flannel. My mom told me to use darker thread. So I bought the thread, unpicked all my quilting,  and then decided I should just machine quilt it. And I’m so glad I did. I’m happy to have it finished after all of the work I put in. Now I can enjoy it. My quilting was a simple free motion echo around the “shape” in each block, and stitching in the ditch around each block.

I enjoy working with wool and intend to start another quilt, but I have not yet decided what it will be. That has not stopped me from collecting wool. I have some from several years ago, but was inspired through and IG conversations I had with @nichole_meister about thrift store shopping for wool. I live close to a great thrift store that gives a 50% discount on prices twice a month so I marked my calendar and went shopping.

I purchased mostly skirts and a couple of dress jackets. After cutting everything apart I will probably never buy another jacket. Too many odd pieces and kind of labor intensive to cut up. I paid $1.50-$3.50 for the skirts. In the right picture at the top you can see I even found some leather. No plans for it either, but thought it would be good to add to my stash. I felted all of the pieces right when I brought them home and cut them apart after that. I definitely want to add some brighter, lighter pieces that have a little “electricity” to them.

The only thing I’ve made with my “new” wool is a pincushion. I like the way it turned out. The texture is different than cotton and gives it an overall softer look.

Happy Quilting! ▶︎ ▶︎ ▶︎


3 Comments

»Wedding Quilt«

This post could have had many different titles…

“Heartfelt Up-Cycle”

“Stepping Outside My Comfort Zone”

“Quilting Brings New Friends Together”

Etc., etc., etc….

I’m sure I could go on but I will stop. This project became more meaningful for many reasons than I originally thought it would. Creating a quilt with fabrics that have a personal meaning is what I did for my friend Tony. The fabric came from dresses that belonged to his mother and grandmother and his wish was to make a quilt as a gift for his niece for her upcoming wedding. Tony had a vision of what he wanted, and he needed a pair of willing hands to execute. His vision guided this creation. Along the way I learned…A LOT! Best of all, I made a new friend.

OLYMPUS DIGITAL CAMERA

Making this was difficult because of the variety of fabrics which included cottons, synthetics, sheers, crinoline, and knits. It was important to incorporate his vision along with my ability. I know, I know, you are looking at this and thinking, “It’s just a patchwork quilt.” However, it started with something more grand in my mind – triangles and other fancy blocks. In the end, I was fulfilling what he wanted and I learned that simple can be better. There is a lot going on with the fabrics and keeping it in squares made sense.Dress Collection

Basting closeup with brown lace

Lace and Crenoline on Green Closeup

It was important to try to capture the essence of the dresses. This was done through layering sheers, lace and crinoline which at times was 3 layers. I liked the outcome, but most importantly, Tony liked it. Every time I make a quilt, I have doubts about something, including my own work. I try to remind myself that quilts are handmade and that the “perfection is in the imperfection”. However, the expectation was high. In hindsight, there are some things that I would have changed, but I chalk those up to the learning experience for future quilts.

OLYMPUS DIGITAL CAMERA

OLYMPUS DIGITAL CAMERA

Finished quilt

THE DRESSES

OLYMPUS DIGITAL CAMERA

OLYMPUS DIGITAL CAMERA

OLYMPUS DIGITAL CAMERA

OLYMPUS DIGITAL CAMERA

OLYMPUS DIGITAL CAMERA

OLYMPUS DIGITAL CAMERA

OLYMPUS DIGITAL CAMERA

OLYMPUS DIGITAL CAMERA

OLYMPUS DIGITAL CAMERA

OLYMPUS DIGITAL CAMERA

Happy Quilting! ▶︎ ▶︎ ▶︎